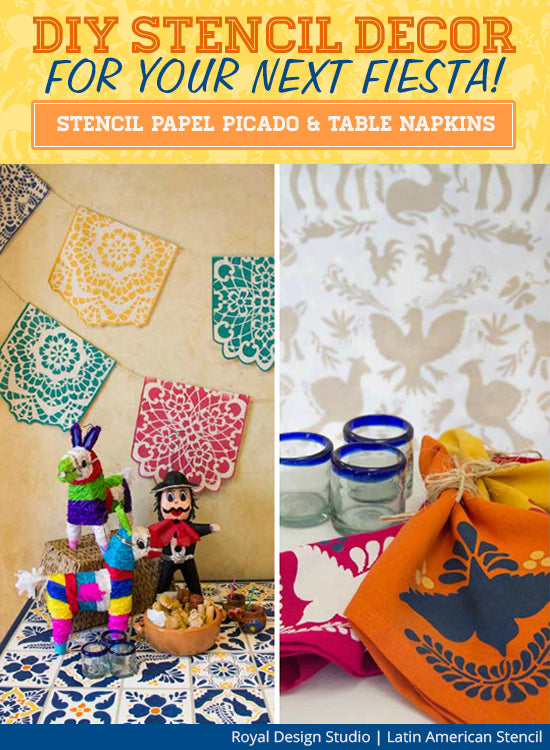
Whenever a stretch of roadway is bedecked with lines of bright and colorful paper cutouts, you can expect to come across a fiesta somewhere nearby. Papel Picado is an enchanting and popular Mexican art form with its roots in the country’s ancient cultures that lends a festive feel to any place.

Traditionally, papel picado is made from folded and scissor snipped geometric pieces of bright and colorful tissue paper. These are glued side by side on a long piece of string measured to needed length. Quick, economical and pretty all at once!
Skilled craftsmen use awls, chisels and special cutting blades to render more intricate designs. Working over a basic pattern, they cut through as many as 50 sheets of tissue paper at a time. The design, often laid out over a delicate window pane background, may include figures such as flowers, foliage, birds, angels, crosses, skeletons and historic figures, as well as words or phrases associated with specific holidays. Borders may be straight, scalloped, zig-zagged or fringed. Each design is a unique and complex work of art requiring a keen ability to envision the use of negative space.
All that sounds really cool and fun, but doesn’t it also sound like a LOT of work requiring finesse and expertise to achieve a desired level of intricacy? It did to us, so we decided to simply do what we do best. Stencil our own papel picado! You can easily make your own papel picado that can look as awesome and intricate with half the effort and time. So are you ready to see how? Let’s jump right in.
Supplies you will need to make your own papel picado:
- Royal Design Studio’s Large Lace Doily Stencil Set
- Royal Design Studio Stencil Brushes
- Annie Sloan Chalk Paints: Napoleonic blue + Greek Blue, Barcelona Orange, Florence, 1pt Arles + 1/10 Barcelona Orange, 1 Emperor’s Silk + 1 Pure white
- Canvas Fabric or Art Paper
- Scissors
- Painter’s tape
- Jute Twine
- Hot Glue Gun
Step 1: Start by cutting a few square pieces of canvas fabric or art paper. The size of these will depend on the size of the papel picado you want. Once you have deiced on a size, cut the fabric or paper a couple inches bigger so you have enough space to work with. We used fabric for this project.
Step 2: Use spray adhesive to keep your stencil in place on the fabric and make sure at least one edge of the stencil is completely inside of the fabric. Be sure to leave a 1” or ½” border on all sides before you start stenciling.
Step 3: After stenciling with a chalk paint, use painter’s tape to create straight edges on three sides of the circular pattern of the Doily stencil. Again, use chalk paint to paint on the outer edge of the taped area in order to create a defined rectangular or square border on the three sides of the papel picado.
Step 4: Allow the paint to dry and then cut along the edge of the pattern leaving an approx. ¼ inch border. To complete the banner, use hot glue to attach various different colored panels to a long piece of jute twine.
Ta-da! Your own fabulous papel picado is ready to be put up and be complimented!
Now how about adding your own handmade table napkins using our Talavera Tile Stencils to this very authentic décor. The steps for these are also very simple and quick. Let’s take a look.
Supplies you will need to make your own Talavera Tile Table napkins:
- Royal Design Studio’s Talavera Tile Stencil
- Royal Design Studio Stencil Brushes
- Royal Stencil Cremes: Pure white, Napoleonic Blue, Barcelona Orange, Florence, 1pt Arles +, 1/10 Barcelona Orange, 1 Emperor’s Silk + 1 Pure white
- Colorful Fabric Napkins
- Spray adhesive
Lay the napkins over a flat surface and using a stencil adhesive, place the stencil on one of the corners of the napkin. For the stencil itself, use one color of the chalk paint for the bird’s body and another contrasting color of your choice to stencil the accents and details.
Mix and match the colors to make each of the napkins look different and unique. Voila! Your napkins are ready to go perfectly with your colorful table setting.
We hope you enjoyed the easy tutorials for a fun and colorful fiesta with family and friends. If you are looking for more fabric stenciling DIY ideas, be sure to check out the following links:
Wish you all a very Happy Cinco De Mayo!

