We get it! Household chores can be such a bore-but the rooms you do them in don’t have to be. Paint and stencils can be your ticket to floors that flaunt your creative style and fun aesthetic taste.
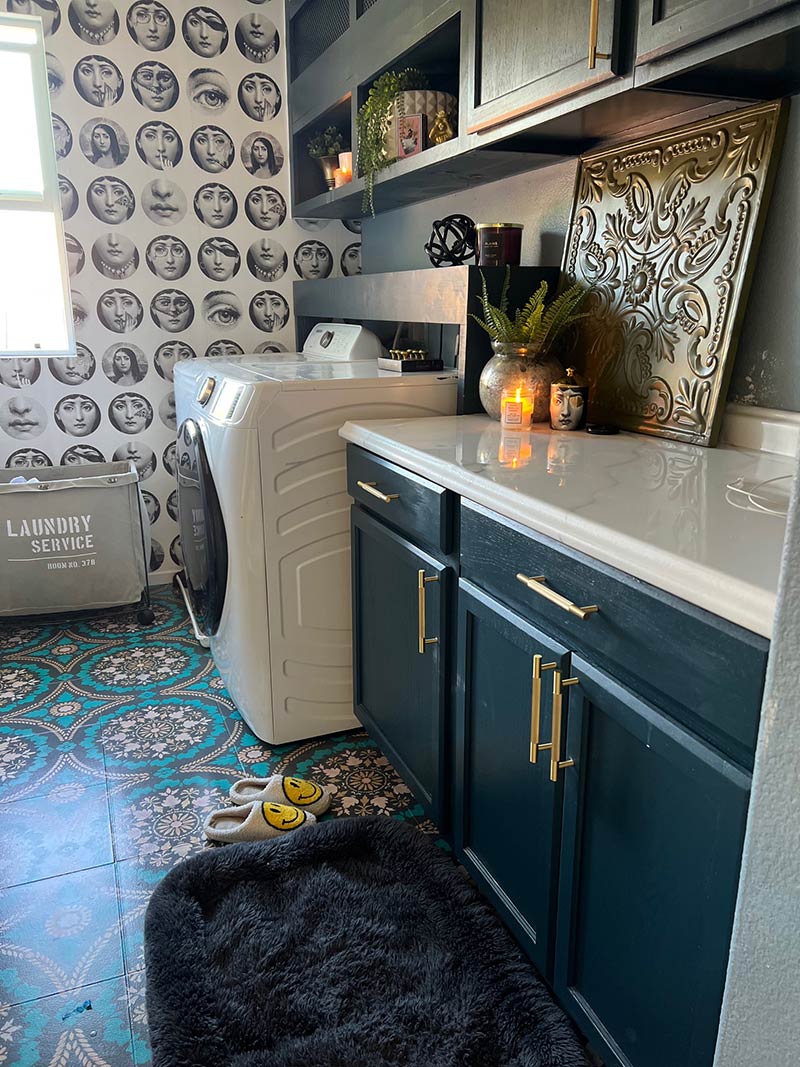
Our talented customer Lauren Samu transformed the blah, beige ceramic tile floor in her laundry room with bright and bold paint color scheme and our popular Mandala Fusion tile stencil. She was kind enough to document her fail-safe process for stenciling tile floors so we can share it and you can do it too!
Stencil and Floor Painting Supplies:
- Small Mandala Fusion Tile Stencil
- Assorted Stencil Brushes (one for each color)
- Kilz Kitchen and Bath Interior Primer
- Behr Cabinet, Door and Trim Enamel in Shadow Mountain
- Americana Acrylic Paints: Peacock Teal, Lagoon, Deep Burgundy, Honey Brown, Cinnamon Stick, Natural Buff
- Diamond Varathane Water-Based Polyurethane (Semi-Gloss)
- Bleach, Medium-Grit Sandpaper
See our How to Stencil Tile Floors Blog Post for further details and tips on painting and stenciling tile floors.

Good surface preparation is the key to stenciled tile success. Clean the floor well with diluted bleach, sand lightly, and clean again. Prime the clean floor with Kilz Primer for Kitchen and Bath. This is a bonding primer that is formulated to stick to glossy surfaces-like ceramic tiles!

Base coat the floor with 2 coats of Shadow Mountain. Note: Lauren prefers to use Cabinet and Trim enamel because it's designed for maximum durability. The finish will be hard and shiny so it may be a bit more challenging for stenciling. You can choose to substitute a good quality latex paint, such as Behr Dynasty in a flat finish.

After your floor has dried for at least a day, gather your stencil supplies. Lauren chose to use a lot of different colors of paint to create a truly custom stencil finish, but you can use the paint colors of your choice. The Mandala Fusion Tile Stencil looks good in so many different colorways-even just using ONE color of paint.


Note that Lauren stenciled the entire floor with full repeats first and then cut the stencil at the end to fit in and stencil the spaces around the edges easily. If you don't plan to use your stencil for other future projects, this is the easiest way to finish off the floor. If you want to preserve your stencil, see this post on How to Stencil Corners, Floors, and Ceiling Lines.
Seal the stenciled floor surface with 2 coats of water-based polyurethane. You can choose a satin or semi-gloss finish depending on your preference.

You may still hate doing laundry, but you will surely love your floor after stenciling!

Find more ideas for stenciling and decorating your laundry room here:
- Stencil a Cottage Style Laundry Room
- Beautiful DIY Laundry Room Makeovers with Stencils
- Clean Up Your Style with Laundry Room Stencils


