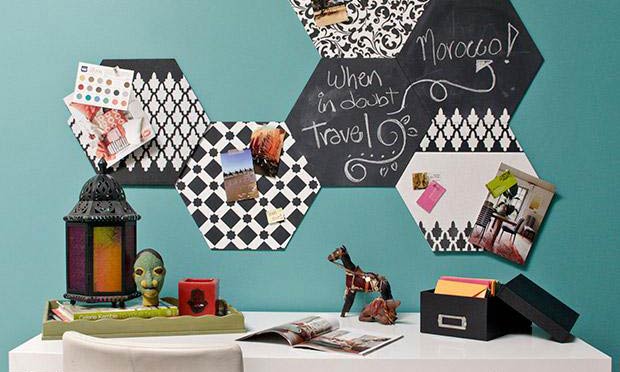
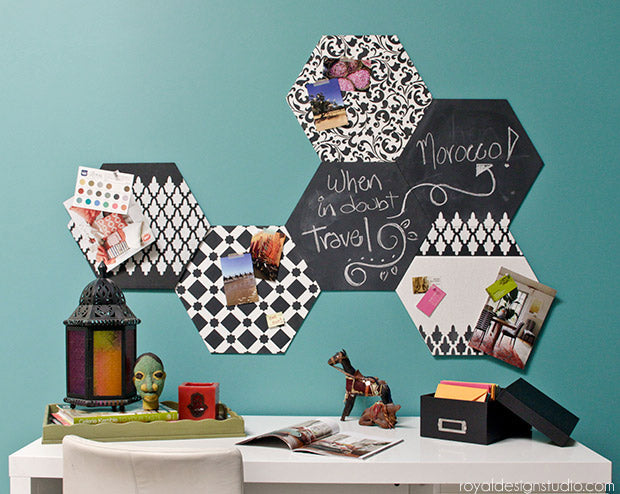
We have just introduced our latest, greatest product for adding more painted pattern decor to your walls. Wall Art Wood Shapes are here!! We are thinking up all sorts of fun ways you can use these lightweight, laser-cut MDF shapes for creative decorating projects. Here's just one: A Moroccan-inspired message center that combines stencils, Chalk Paint® by Annie Sloan, a little imagination and a lot of style.....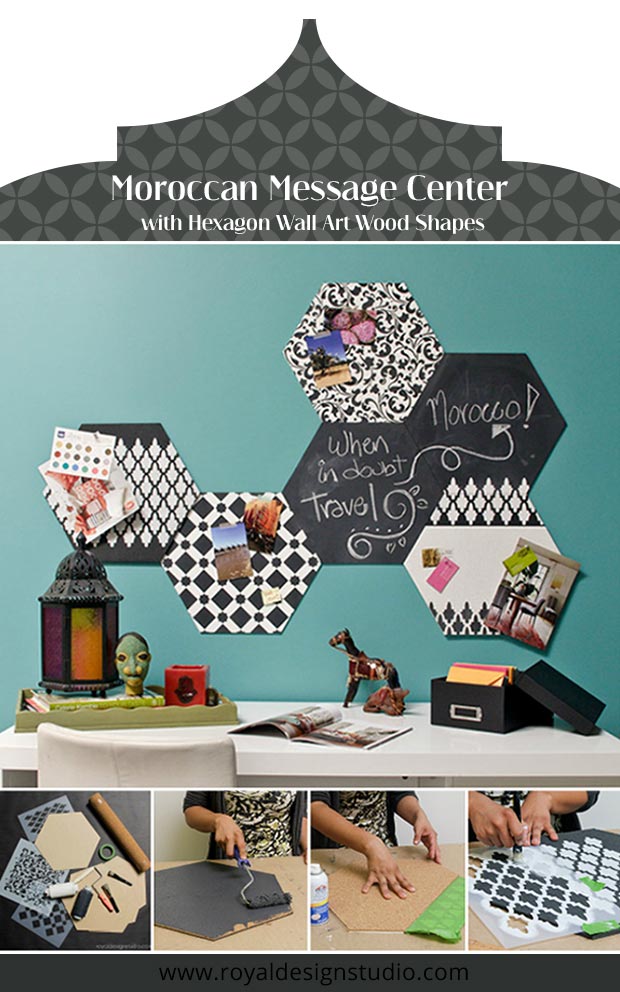
This is a great DIY stencil project for adding a little more organization to your office, craft room, kitchen, or wherever you want to gather your thoughts and inspiration. It combines hexagon tiles for taping up ideas, chalkboard tiles for writing things down, and even stenciled cork for pinning things you want to keep handy.
After many stencil travel adventures to Morocco, Royal Design Studio has a wide variety of Moroccan stencils to choose from and we thought they would be perfect for this graphic black and white stencil project. Of course you can use any stencils that you have on hand, or select some alternate options from our Furniture Stencils and Mini Craft Stencils Collections.

Our Hexagon Wall Art Wood Shapes are sold individually, and in economical sets of 3, 5, and 10. You can use any number of shapes to create your message center. We used 6 for this project, but also share above some alternate ideas for using 5 or 7 tiles. The choice is yours and your message center wall art can be as small or large as your space allows!
Stencils and Supplies:

- Royal Design Studio Moroccan Stencils: Moroccan Arches Furniture Stencil, Sultan Swirl Furniture Stencil, Star Diamonds Furniture Stencil
- Assorted Stencil Brushes
- 5-7 Hexagon Wall Art Wood Shapes
- Chalk Paint® by Annie Sloan: Graphite, Pure White
- Natural Cork Roll
- Nylon roller, handle and tray
- Spray Adhesive, ruler, Frog Tape Painter’s Tape
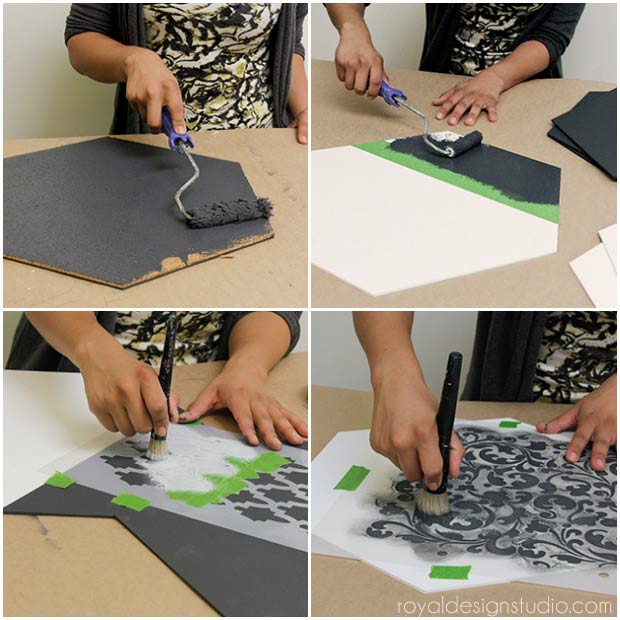
Step 1: Base coat each of your Hexagon Wall Art Wood Shapes. Base coat 3 with Pure White Chalk Paint®and the other 3 using Graphite Chalk Paint®. Note: When using Chalk Paint® to create a chalkboard surface 3 coats is required, so be sure to paint 3 good coats with the Graphite color. Paint the sides and back as well for a nice finished look.
Step 2: Tape off the top part of one of the white shapes with Frog Tape and paint with Graphite Chalk Paint®.
Step 3: Butt-up the black area of the shape you just painted with another hexagon painted with Graphite. Stencil three rows of the Moroccan Arches Furniture Stencil, using a 1” Stencil Brush and Pure White Chalk Paint®. The stenciling should start at the edge of the Graphite area on the bottom shape and overlap and finish on the top shape.
Step 4: Stencil both Pure White Hexagon Shapes using Graphite Chalk Paint® for the stenciling. It is nice to mix up stencil pattern styles in this type of arrangement so we chose an organic, swirly shape to compliment 2 more graphic, geometric patterns. Stencil one shape fully with the Sultan Swirl Furniture Stencil and the other with Star Diamonds Moroccan Furniture Stencil.
Once all of your shapes are base painted and stenciled, it’s time to add some cork accents to give you some areas to tack up important papers, inspiration photos, etc.

Step 5: Trace one of the Hexagon shapes twice in to the roll of cork. Carefully cut it out using an exacto blade or craft knife and a metallic edge ruler. Cut off the top of one of the cork shapes to match the exact size of the white area you created on one of the Hexagons in Step 2.
Step 6: Apply a generous misting of Spray Adhesive to one side of the cork and glue it onto place over the painted MDF shapes. The shorter hexagon piece will be pasted to the white shape with small black stenciled area at the top. The full Hexagon cork piece will go over one of the plain Graphite painted shapes.
Step 7: Paint the cork shapes to match the color of the original shape they are mounted on. Allow to dry.
Step 8: On the Graphite painted cork, center the Moroccan Arches Furniture and stencil with Pure White. Repeat the stencil horizontally only in this shape, leaving the top and bottom area plain. This just adds more variety to your grouping. Of course you can stencil it all over if you wish! Allow To dry.
Note: Before using the Graphite painted pieces as chalkboard, you will want to condition the paint so that it will be easier to write and erase with chalk on the surface. To do this, simply lay a piece of chalk flat on the surface and rub it all over-going vertically first and horizontally second. Then, simply rub off the excess chalk with a dry rag. Now, you are ready to go!
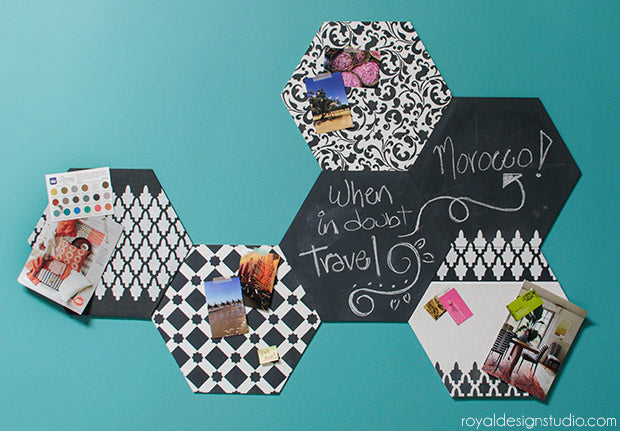
Hang the stenciled Hexagon Wall Art Wood Shape with double-sided mounting tape. Scotch makes Removable Mounting Squares are that are strong enough to hold the individual, lightweight wood shapes, yet will not damage you walls when you want to remove them. We recommend 2 to 4 squares per tile, depending on the size. We hung our hexagon shapes so that they are butted up against each other, but you can also leave a small amount of space between the tiles. This allows the wall color to come through and also be a part of the design.
We're sure you can think of many more amazing ways to paint and decorate our new Wall Art Wood Shapes. When you do, please be sure and send us pictures and details to projects@royaldesignstudio.com. We love to share!
See how we used our Mini Craft Stencils with the smaller version of the Hexagon tile shapes in this Mix and Match Wall Art DIY Tutorial


